Monday 19 November 2012

Trees for tomorrow

-->


Hello All,
We have been trying to use the slower wintertime well with lots of planning. One of the new aspects of the farm we are keen to move forward is the planting of fruit trees with the aim of having a fruit share as well as a veg share.
Eventually it would be great to have an orchard area that is devoted to the production of fruity things. Soft fruit too would make the fruit share more rounded and go on longer but this will involve some form of refrigeration so won't be part of the first phase in development.

The first part of this plan is to plant a variety of fruit trees around the farm. This might involve filling in the gaps of the existing line of trees that run through the middle of the field. This row of trees marks the original boundary where the land was once divided and we'd like to see it reinstated. Also or alternatively trees could be planted around the new social area that is in current discussion, this would bring the trees very much into sight for the projects members at social gatherings.

The immediate issue the farm has is that we are starting up on very limited means and the cost of buying in more that a few trees would be prohibitive at this stage. Because of this Bennison Farm and Bennison Farm CSA are looking for people to sponsor a tree for the farm with the understanding that the bulk of the fruit from the tree is destined for the CSA members. Those who sponsor a tree will be able to choose the fruit i.e., Apple, Pear, Plum etc and will be able to come and collect the first kilo of fruit from the first harvest as a thank you. There will also be orchard updates and a special card detailing that a tree has been sponsored.

The working title for the scheme is 'Trees for Tomorrow' as this is a long term project that hopes to replace one of some many orchards in our area that were grubbed up during the 20th century.
In line with the land's conversion to Organic, the trees will be bought from a certified Soil Association Nursery and will be certified organic from April 2014.

If you would like any more information about sponsoring a tree please get in touch with us at info@bennisonfarm.co.uk

Wednesday 31 October 2012

Potatoes & Onions

 
Our Potatoes have ended now because we don't have all the machinery required to do large scale Potato production. One or two people thus far have dug all the Potatoes by hand, which is not sustainable when doing the amount needed to feed people during the winter.

We have sourced local Organic Potatoes from Saxmundham in Suffolk which was the closest we could find them. Our long-term aim to grow everything that goes in our Veg share, but having a limited amount of start up money meant we had to eak it out efficiently. Buying expensive large scale Potato harvesting equipment would have been hugely expensive and consequently Bennison Farm took the decision that to buy in for the short term was the decision.

Also this week is the first of the Onions, which hail from Norfolk. We moved here in February of this year and by the time the land was prepared it was too late to plant Onion sets for this year.  This again is not a long term decision but one taken in order to provide the best alternative to our own grown veg for this winter.

The other alternative was to not supplement veg for the share and consequently have a smaller share. As the scheme is in it's very early days this could have had the affect of discouraging people from keeping up their Veg share. The farm discussed the options with the CSA steering group and it has been agreed to supplement for this winter. However if any one has any concerns, questions or suggestions please do get in touch with me at info@bennisonfarm.co.uk and mark it for the Steering group.

Monday 22 October 2012

A few odds and ends!


 The Carrots are doing very well! The soil still needs alot of work however, it's sad to see how conventional farming can take so much out of such a vital medium. Over the coming season our focus will be on improving the health and fertility of our soil.
 
First attempt at a flashy commercial? ......um no, but funny all the same :)

Viva Polytunnel

The Polytunnel is up! Hurrah.

It was a shared effort that took alot of work.

 Here is one of the first post holes dug on a shared work day. It was just after Danny's unexpected trip to hospital and we were feeling over whelmed with how much work there was to get done. The response from members was so welcome and heartening. It was one of those moments that remind you that this is your home.
 Members dig, dig digging in the Barley
 These first 3 photographs were taken by Frank, thanks Frank!
 The trenches! Once the post holes were dug and the concrete poured we needed to dig the trenches around the edge to earth in the polytunnel cover.
 The trenches also doubled as a good wind break, nest, tunnel and den.
 Danny and My Dad ( who is possibly channelling Mr Motivatorr in a towelling sweat band) after the finish putting up the hoops of the polytunnel. Claire B should also be in this photo as she did alot that day!
 Huzzzar!
 Last job before skinning the tunnel, putting up the cross beam that would support the door. Mathew kindly volunteered to lend a hand. But we only had one ladder pictured here. But Mathew is a chap who thinks out of box..
 This is a true multi purpose vehicle. A bit tricky to find ones balance at first...
 But after a bit of practice the focus doubles nicely as a large golden stool.
 Shared work day! The task, covering the tunnel. It was beautiful weather and we had our best turn out yet.

 Up and over the top. I was ill that day but I was told there was a huge collective 'ahhhh' from all once the cover was over.
Finally a view inside the covered tunnel. Things have moved on since then as Danny has been rotovating away to his hearts content.

Wednesday 17 October 2012

A starring role for cabbage


I first came across Ribollita at the Chappel beer festival on the wonderful vegetarian food stall run by Leon Lewis.  I was boracic as usual so went for the cheapest thing on the stall, despite the fact that a stew with bread and cabbage didn't sound particularly appetising.  As you might expect from an Italian recipe it was, of course, delicious.  It is a real Italian peasant dish, economical, nutritious and really tasty.

After enjoying this stew three years running at the same festival I eventually begged Leon for the recipe, which is adapted from the Greek stew in his book More Vegetarian Dinner Parties published by Free Range publishing, and I would recommend you get hold of a copy.  Inevitably the recipe below has been fiddled about with over the time I've been making it, so go back to Leon's version in the book for a faithful reproduction of the tasty beer sponge I first enjoyed several years ago.

Half eaten: I waded right in, forgetting I was supposed to take a picture to show you first. 
The amounts indicated below should feed three to four, although we demolished it between the two of us this evening.

About four tablespoons olive oil
1 onion, roughly chopped
200ml white wine or vegetable stock
1 carrot, chopped into about 1cm chunks and lightly cooked (I usually nuke it in the microwave)
200g cabbage, cut into smallish strips
1 tin of tomatoes
2 cloves of garlic, chopped
A slice or two of stale bread torn into pieces
A tin of cannelini beans
A bunch each of parsley and basil, roughly chopped
A slug of fresh orange juice (it should be bitter orange, but I can't lay my hands on them unless it's January and I've found decent unsweetened stuff is fine)
Pepper and salt

To serve: grated parmesan and a drizzle of tasty olive oil

  1. Start by frying the onion slowly in the olive oil until it's soft and translucent; this usually takes ten minutes or so; add the garlic for the last few minutes.  While this is cooking you might want to cook the carrot.
  2. Add in the cabbage, carrots, tomatoes, cannelini beans, the wine or stock, and the bread.
  3. Allow this to cook for a while then finally add the parsley, basil and the orange juice.
  4. Season well and serve in bowls - it's quite sloppy, offering the parmesan and olive oil for people to help themselves.
I first served this at a New Year's eve party and it disappeared gratifyingly quickly - albeit mostly before breakfast on New Year's day, accompanied by Bloody Marys!
Libby


Wednesday 3 October 2012

Carrots and Chard: The Start of Autumn Cooking


Carrots and Chard: The start of autumn cooking.
The change in the weather has been echoed by the change in vegetables arriving in the veg share.  As a natural response to this my cooking here at home has changed, with refreshing salads being replaced with comforting soups; richer umami flavours taking the place of the fresh crisp tastes of summer.  Today’s lunch consisted of the leftovers of last night’s cheesy chard tart and carrot and coriander soup.  Both are straightforward to make and seemed well matched to the sunny but cooler early autumn day.
Carrot and coriander soup
A quick recipe inspired by one by James Tanner from Ready Steady Cook, tweaked and multiplied up to feed four.  It is better with home made vegetable stock but I usually use the powdered one made by Marigold, made up slightly weaker than recommended.

Olive oil
1 onion, chopped
5 large cloves of garlic, chopped finely or crushed
4 tsp coriander seeds
400g carrots, chopped
1 litre vegetable stock
60ml double cream
60ml plain yoghurt
A good handful fresh coriander, chopped roughly

  1. Start by toasting your coriander seeds in a dry frying pan.  I use a cast iron one for this job.  All you need to do is put the seeds into the dry pan and heat them until they start to turn a toasted colour, release their fragrance and to jump about in the pan.  Watch them like a hawk, they’ll burn in seconds.  Take them off, put them into a pestle and mortar and bash them like mad until they go reasonably powdery.  How much you do this depends on how large you mind the spices being in the final soup, bearing in mind they soften as they cook.  I don’t mind a few slightly larger lumps of shell so just grind them until I get bored with the job.
  2. Saute the onion and garlic for a few minutes until they turn soften, then add the coriander and cook a bit more until they start to smell gorgeous and lemony.  This is the reason I insist on using whole spices rather than powdered ones, despite the extra work.  The fragrance is just impossible to match with the powder, and you really can taste the difference in the finished soup.
  3. Add the carrots and the stock, bring to the boil and then turn the heat down a bit, allowing the soup to simmer for a while – about 15 minutes should do it.
  4. Take the soup off the heat, and add the cream.  Allow it to cool a bit, then blitz thoroughly until the soup is smooth and glossy.  I like a stick blender best for this job.  I tend to wait to season with salt and pepper until this stage so that I can control the seasoning by tasting as I go.
  5. Add the yoghurt and the chopped coriander leaf.
  6. Either serve immediately, or if you’re eating it later make sure when you heat the soup you don’t let it boil to avoid the risk of splitting.
Cheesy chard tart
Inspired by the recipe in Nigel Slater’s wonderful Tender, but tweaked to accommodate my laziness.  This tart serves six in theory, but the two of us demolished it in two sittings – perhaps partly because Richard ate a third of it in one go for supper.  It is actually best served cold, but is also nice warm with a crisp green salad dressed with spring onion, lemon juice and olive oil.

Chard, with its strong earthy taste, responds best to bold flavours so I like to choose recipes that use strong cheeses or bacon.  I admit to being a bit of a chard shirker so the gentler treatments that rely on the unctuousness of cream are not for me, but may be worth trying if you’re a big fan.  Medium sized leaves, about the size that have been appearing in the veg share, are milder than the larger ones, and if you grow your own the tiny ones are very nice in salads.

The recipe asks for Parmesan.  There are several vegetarian alternatives to this.  The one by Bookhams marketed as Not Just a Pasta Cheese, previously called Twineham Grange works well.  Nigel Slater suggests Pecorino or Spenwood as alternatives.  The latter is a real artisan cheese and is made with vegetarian rennet, but I haven’t tried it yet.

For the pastry
175g plain flour (I used half white, half wholemeal, which gives a nice texture)
75g butter at room temperature
A pinch of salt
Half a teaspoon mustard powder
40g grated mature cheddar
A small bunch of thyme, leaves removed from the stalks
A little chilled water to bind

For the tart
About 200g medium sized chard leaves – washed well
2 large shallots sliced finely
50g mature cheddar, grated
40g parmesan, grated
2 large eggs
300ml double cream

  1. Start by making the pastry.  Put the flour, mustard powder and salt into a bowl.  Rub in the butter until you get a breadcrumb-like consistency, then add the thyme leaves and the cheese and mix in thoroughly.  Add water gradually until the pastry comes together.  Last time I needed 3-4 tablespoons, but it depends on the flour and all sorts of other factors.  Wrap the pastry in clingfilm and allow it to chill for half an hour in the fridge.
  2. Roll out the pastry thinly on a floured surface.  Put it into a flan tin about 25cm diameter. (Against all advice I use a ceramic tart dish, which is supposed to make the pastry soggy but doesn’t seem to in my experience).  Chill again in the fridge for another 30 minutes.  I know this seems like overkill but the first chill is to allow the gluten to develop, so the pastry is nice and elastic when rolling out rather than breaking up horribly; and the second helps to stop the pastry shrinking when you cook it.  Don’t bother if you don’t want to, but don’t blame me if it doesn’t work properly.
  3. While the pastry is chilling steam the chard until it’s wilted down.  Allow it to cool a bit, then squeeze it out to get rid of as much water as you can.  If you don’t it will send the filling watery.  Chop the dried chard roughly then mix the shallots in and season with salt and pepper.
  4. Pre-heat the oven to 200oC/gas mark 6
  5. Blind bake the pastry case for about 15 minutes until crisp and golden using whichever method you prefer (line with foil or greaseproof and weigh down with baking beans or use Delia’s method of stabbing the case all over with a fork to prevent air getting trapped).  If you used foil or greaseproof remove it for the last five minutes to give the pastry a chance to go crisp on the base.
  6. Put in the chard/shallot mix, then scatter the mixed grated cheeses over the top.  Finally whisk together the cream and eggs and pour over the whole tart.
  7. Return to the oven for 20-25 minutes.  When it comes out try to cool for a while to give the filling a chance to set properly. 
If you serve it with salad this one works well.  Go for simplicity so one or two types of leaves, torn into bite sized chunks and washed thoroughly.  I use my salad spinner to dry the leaves out afterwards.  Deeply unfashionable but by far the neatest and most effective method I know of.  Finely chop a couple of spring onions and put into a jar with the juice of half a lemon, about three times the amount of extra virgin olive oil and salt and pepper.  Put on the lid, shake like mad until emulsified then dress the salad lightly.  

Libby

Wednesday 12 September 2012

Workday and Danny update

We had a really good workday and mini social on Sunday the 2nd of September. In fact every workday and social have been lovely, getting to know new people each time.

We've started having mini socials after workdays, these are great and everyone can get involved, bring a dish and enjoy a shared picnic together.

My favourite photo from the day was this one!

It was spotted by a member during the farm walk and I understand it to have been to the members supper that night.


Get well soon Danny!
Danny pictured here, has been experiencing weakness and numbness down his let hand side coupled with a bad headache.

It culminated in a brief spell in hospital but thankfully he is home but needs to try to relax a little more. We had help with last weeks harvest from Danny's parents Judy and Dave and also from the wonderful Claire Brammer! 
This week we knew in advance that Danny wouldn't be able to harvest at his usual speed so we put a call out, firstly to the Steering group and secondly the membership as a whole. The response has been tremendous. Danny had help yesterday evening, he's at the farm now with more help and we have a work party ready and eager for Friday!
As I put in a email reply to a member yesterday "We are feeling so blessed and lucky to have ended up surrounded by such thoroughly good and generous people."
The Friday work party is to dig the holes for the new polytunnel arriving any time now as our minds turn towards autumn and prolonging our growing season.

Although the last week and a bit has been difficult it has given us a boost in that it has allowed us the opportunity to see the community aspect of the scheme come into the limelight and shine.

To all those who have got in touch with help, support and messages of friendship, Danny and I would like to extend our dearest thanks and appreciation.

And finally here are last weeks recepes compiled by a fab Steering group member, enjoy!

This week some suggestions for using beans in their various forms
Broad beans, herbs and bacon
A delicious supper suggestion from Nigel Slater (Tender volume 1).  It is supposed to serve two, although in our household we’d want pudding afterwards, it is a light meal.
I recommend you use good quality dry cure bacon.  We always buy free-range, not only for the sake of the pigs but because it really does taste better.  The better quality dry cures should also avoid the horrible white liquid that appears when you fry poorer quality bacon.
250g shelled broad beans
6 spring onions
A small bunch each of dill and mint
2 tbsp white wine vinegar
Extra virgin olive oil
4 rashers smoked back bacon
First cook the beans for four or five minutes in salted boiling water.  Refresh them by running them under cold water, and then remove the greyish skins, reserving the tender beans inside.  You can get away with leaving the skins on the tiny ones.
Slice the spring onions finely and put them into a bowl with the chopped dill and mint.  Add the vinegar and season with salt and pepper.  Add enough olive oil to turn it into a thickish salad dressing.
Stir in the beans.
Fry the bacon until golden and crisp
Divide the beans between two plates, top with two rashers of bacon each and pour the fat out of the pan over the beans as a final dressing (it really does work)

Multi bean salad
I tend to make this with a mix of beans that depends on what’s available.  There are usually French beans, plus shelled broad beans, sliced runner beans, sugar snaps or even well rinsed tinned flageolet or cannellini beans if there’s nothing else around. Go for a mix of three or four, ideally no more than one sort of pulse, or it can get a bit turgid.
This dish is particularly nice with roast garlic, and I tend to stick a few whole unpeeled cloves of garlic around the Sunday roast just so I’ve got a few hanging around for this sort of thing.  Otherwise young garlic is fine or even garlic chives when there’s nothing else available.
We usually serve this with a variety of other salads (tomato salad, green salad, potato salad etc) as an accompaniment to a vegetable tart, cold ham or Spanish omelette.
A good handful of beans per person.  Aim for three or four varieties, as suggested above.
Roasted or young garlic, chopped finely
A bunch of parsley, chopped
Extra virgin olive oil
Lemon juice
Salt and pepper
Boil the beans until they’re tender to the knife (you don’t need to do this for any tinned beans you’re using, just give them a really good rinse), then refresh under cold water to keep them looking bright.  Put all the beans into a large bowl.
Stir in the garlic and parsley, and dress with the olive oil and lemon juice, using roughly three times the amount of olive oil to lemon juice.  Do this while the beans are still warm so they absorb some of the flavours of the dressing.  Season to taste.
Allow the beans to cool properly before serving.


Friday 31 August 2012

Update and recipe!

Hello All!

I have had a little break away from the blog and am now feeling very refreshed and enthused.

We have finaly received planning permission to put up two polytunnels on the land. We purchased one tunnel earlier in the year with a view to put it up at the of the summer so the planning permission has arrived just in time.
Polytunnels will really help us extend our growing seasons. As well as tomatoes, peppers and cucumbers in the summer we will grow salads and oriental greens in the winter and a range of spring crops that would otherwise come much later. Carrots, sugar snap peas, spring onions and spring greens will help bridge what is often called the ‘hungry gap’ in late spring.
We will hopefully have the tunnel delivered and start putting it up in the next couple of weeks any help will be greatfully apreciated.


Here is a bumper load of recipes ! 

In the hope of an Indian summer, this week we’re giving some salad recipes.  These recipes both incorporate mayonnaise, so I would suggest serving them with simple accompaniments to prevent them seeming overly rich.  Cold ham, poached salmon or a green salad can all work well.

Potato Salad
Serves 2-3
500g small new potatoes
6 spring onions
A small bunch chives or garlic chives
Yoghurt
Mayonnaise
1) If the potatoes are oddly sized cut them into similar sized pieces, you want them to be about bite sized.  Put them into a pan of water and boil until they’re cooked; they should drop off a knife quite easily when prodded.
2) While the potatoes are cooking finely chop the spring onions and the chives and put them into a bowl big enough to take all the ingredients.
3) Mix equal quantities of mayo and yoghurt together and season well.
4) Once the potatoes are cooked drain them and set aside to cool a little; leave the lid off to prevent them from getting soggy.
5) Add the potatoes and the dressing to the alliums, stir together and
serve cold.


Coleslaw
Serves lots (we fed eight from it the other day, with a selection of
other salads)
1 small cabbage
1 onion
2-3 carrots
1 fennel bulb (optional)
Wine vinegar
Good quality mayonnaise
1) Finely slice an onion, put it into a bowl and drizzle over some vinegar.  Leave it while preparing the other ingredients, giving it the occasional stir.  The vinegar reduces the harshness of the onions, helping it to integrate with the other ingredients.
2) Remove the tough outer leaves of the cabbage and reserve for another recipe.  Then quarter the cabbage from root to point.  Shred each quarter finely into matchsticks.  If you’re using it, quarter the fennel the same way as the cabbage and slice finely into similar sized pieces.  Grate the carrot.
3) Drain the onion, discarding the vinegar
4) Mix the vegetables together in a large bowl then add a good dollop of mayonnaise stirring it through.  Make sure the vegetables are well coated but don’t use too much mayo, or you won’t taste
the vegetables.
5) Season to taste


Middle Eastern patty-pan squash
This recipe is equally good with patty pans or with courgettes.  It’s great with grilled fish.  This week we’re having it with Marine Stewardship Council certified Hake which we will lightly coat in seasoned flour and then fry on both sides in butter.

From Nigel Slater’s Tender volume 1.  This is a wonderful book full of simple and inspiring vegetable dishes both the veggy and the omnivorous.

Enough for 2

 About 400g courgettes, patty pan squash or other summer squash
2 cloves garlic
3 tbsp olive oil
A handful of mint leaves
A small handful flat parsley leaves
The juice of half a lemon
Cut the courgettes or squash into short lengths (think chunky chips)

    Peel and coarsely chop the garlic and fry for a minute over a medium heat, then throw in the squash. 

Cook in the oil until light gold and tender.

Add the mint and parsley

Turn up the heat and add the lemon juice, let it bubble briefly

Crumble over some sea salt and serve immediately.


Aloo Palak (New Potatoes and Spinach)

From Gupareet Baines, Indian Superfood.

For four as a side dish

1 tablespoon oil (Mr Baines suggests olive oil but I opt for a high temperature oil such as groundnut).
1 tsp cumin seeds
1 tsp nigella seeds (sometimes sold as black onion seeds)
½ tsp mustard seeds
A piece of fresh ginger the size of a matchbox, peeled and cut into small batons
4 garlic cloves
1 tsp turmeric
6 baby new potatoes, cooked and cut into quarters
A couple of green chillies finely chopped (or up to six if you like your food hot), finely chopped
400g spinach leaves

Get a wok really hot and then add the oil, heating that until it’s nearly smoking.

 Add the cumin, nigella and mustard seeds and cook until they start to pop then add the ginger and garlic and stir-fry briefly, then add the turmeric and mix well.

    Throw in the potatoes and chillies and stir-fry until they’re heating through, then add the spinach, mixing it in, and stir-frying it until it’s wilted.

    Season to taste and serve immediately.


These wonderful recipes were compiled by a brilliant member of the CSA steering group!


Tuesday 14 August 2012

What a WEEK! ...and a bit

Wow, this week has been full!

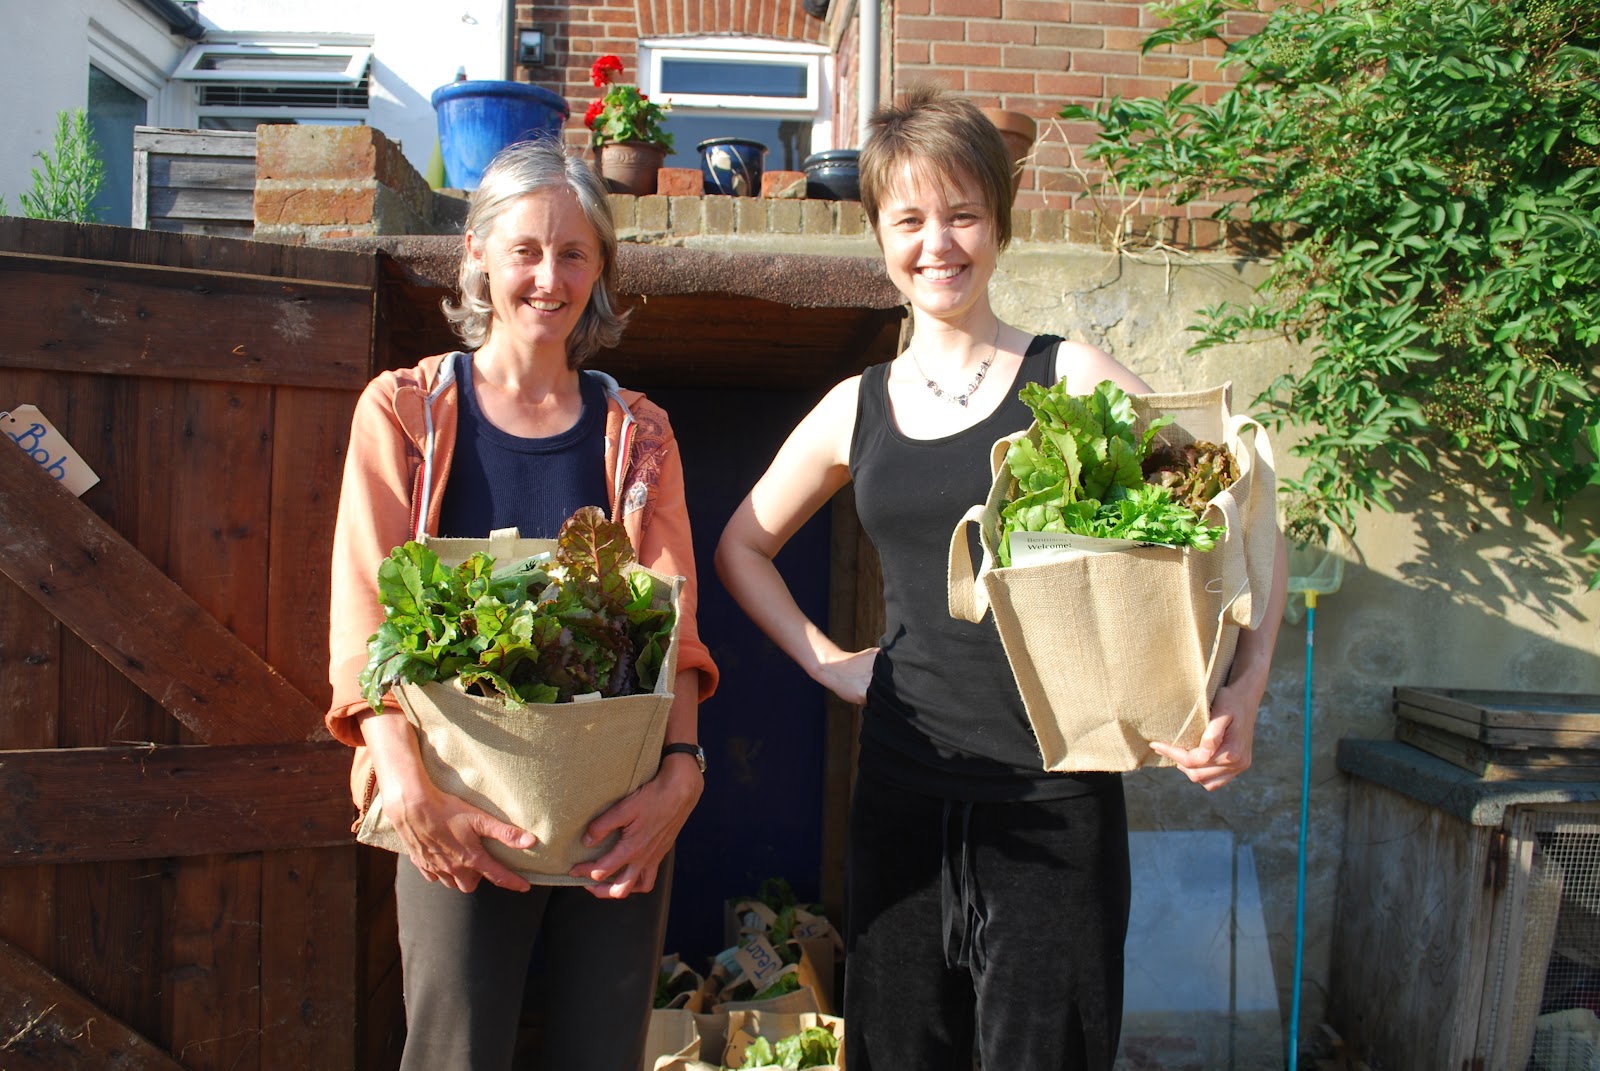
When I last blogged we'd just given out the first veg share, following that work day/ first social event and then we did the share all over again.
Here are a few pics from that first pick up!


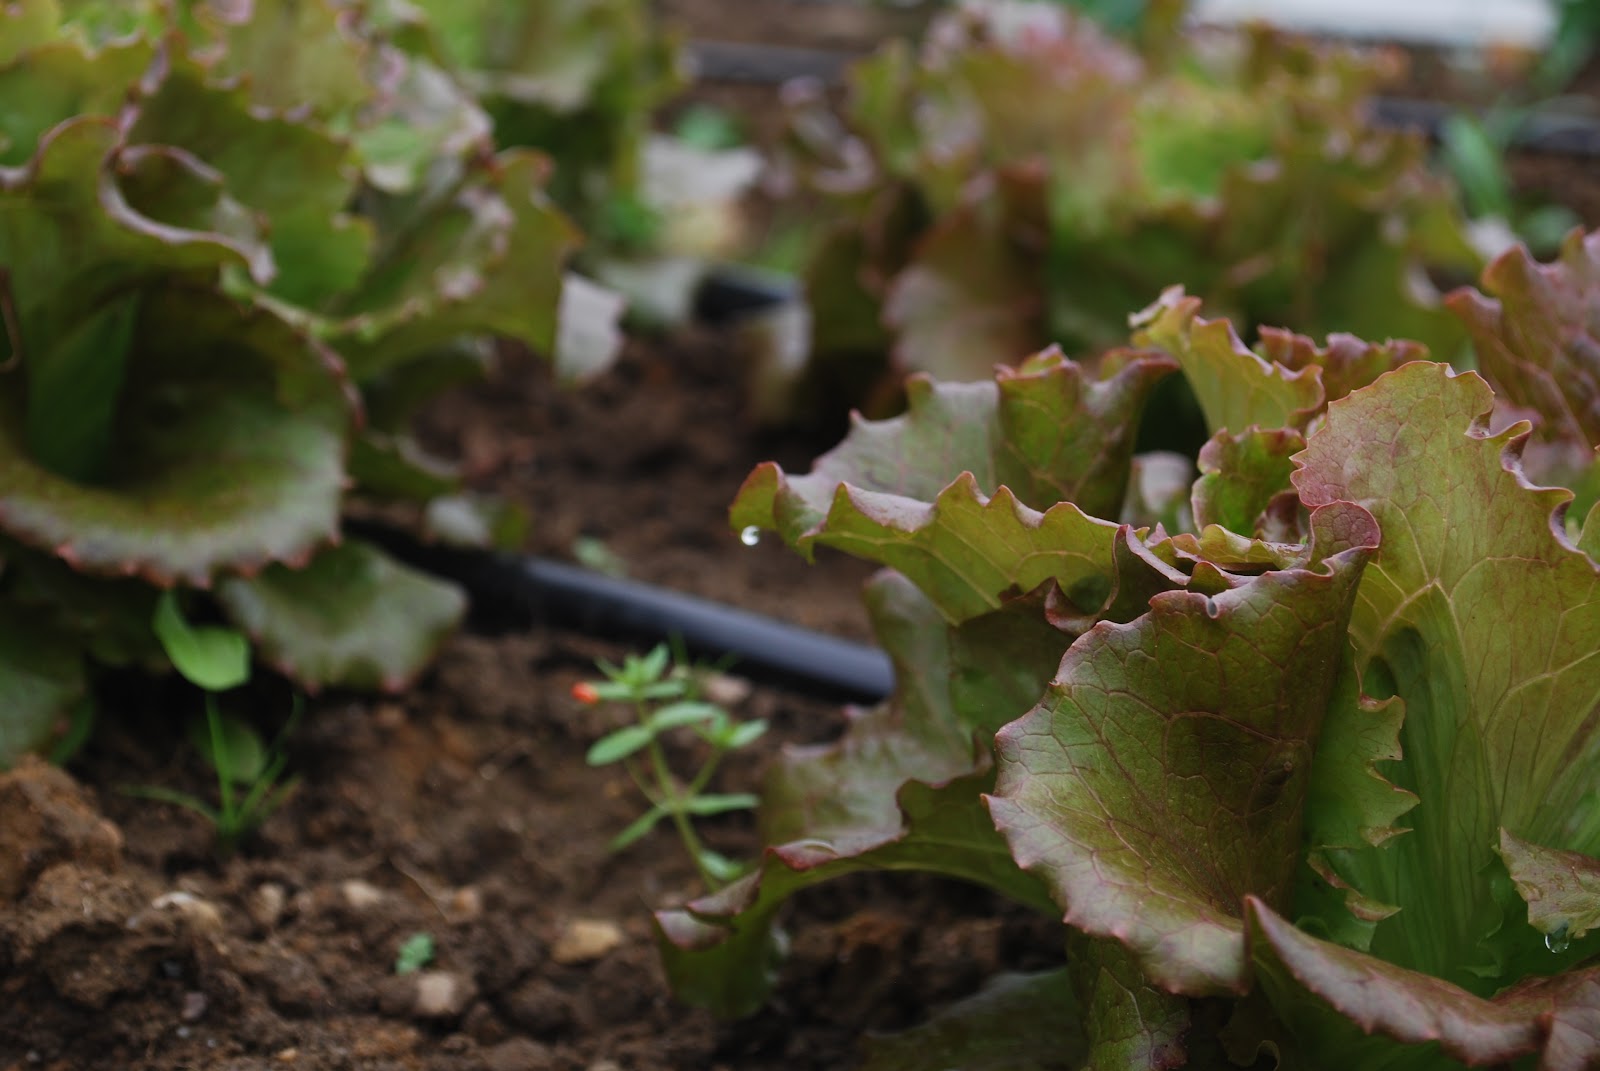
In between that we have been planting Pak Choi, Chinese Cabbage, Chicory, Endive, Winter Radish, Kohlrabi, Turnips and more Coriander.

The work day and social were held back to back as one event on Saturday 4th.
The sun shone for most of the day with only one shower to hide from.

The workday task was weeding the carrots, and the results are great, the Carrots were doing well but now they are in prime condition to be a great crop.


Unsurprisingly given the damp warm conditions we have blight coming through the Potatoes but we will still have potatoes into the autumn, after which the CSA steering group will decide if we buy in local organic potatoes to go through the winter with.

French beans doing really well, carrots great after work party weeded, leeks coming on well for autumn Squash starting to fruit, things are good ont the farm.

I thought I would post up the recipes that have been going out with the veg shares.

These have been compiled by a brilliant member of our steering group!

Not quite Nicoise

Not quite because there is no fish in it, and I’m not sure it needs the olives either, so I often leave them out, or use capers instead.  Based on Hugh Fearnley Whittingstall’s recipe in River Cottage Veg Every Day.

For two (multiply up for more people)

250g new potatoes

120g French beans cut into about 5-6cm lengths

3 eggs.  We always use organic or alternatively what I think of as very free range (the sort from hens that peck in back yards rather than the ones that just comply to the lowest legal standard for free range).  Not only do they have a better life but they taste so much better as well.
A couple of large handfuls lettuce

A couple of sprigs of basil (about 8 leaves)

A scattering of tiny black olives or capers

Salt and pepper

For the dressing you need a tiny garlic clove (one of the little useless ones from the middle that you never know that to do with – or is that just me?); One and a half tablespoons good olive oil; half a tablespoon wine vinegar; half a teaspoon Dijon mustard and a pinch of sugar.

1.       Cut the potatoes so they are similar sizes and boil until cooked.  You need to cook the eggs and French beans at the same time.  I usually steam the beans over the pan and drop the eggs into the boiling potato water for the last four minutes of their cooking time.  Saves washing up multiple pans.

2.       While the spuds, eggs and beans are cooking wash and dry the lettuce (a salad spinner really helps here, one of the few gadgets that gets cupboard space in our house) and pile into a large dish.

3.       Once the eggs, potatoes and beans are cooked drain them and leave to cool.

4.       In the meanwhile make the salad dressing by crushing the garlic clove to a paste with a bit of grainy sea salt and then put it and the rest of the ingredients into a little glass jar.  Screw on the lid and shake like mad until it all emulsifies into a gorgeous golden coloured goo.

5.       When the potatoes and eggs are cool enough to handle first cut the potatoes into wedges or chunks and toss them with a bit of dressing with the green beans.  Toss the lettuce leaves with some more salad dressing.  Peel the eggs and cut into quarters.

6.       Assemble the salad by gently tossing the lettuce, beans and potatoes together in their bowl, adding the pieces of egg and the olives or capers if you’re using them.  Then scatter over the shredded basil, drizzle with the rest of the salad dressing and season with salt and pepper.

Krystof Potatoes

These are named after the wonderful Polish chef who inspired this recipe by serving me something similar several years ago.  They make a great summery alternative to roast potatoes.

Take small new potatoes, if necessary cutting them so they are not too dissimilar in size.  Put them in a bowl with a tablespoon or so of olive oil, coarsely ground salt and pepper and some woody herbs.  Thyme is good, but as often as not we use dried oregano.  Toss the potatoes and flavourings together and pour into an ovenproof dish large enough so they can lie in a single layer but small enough so there is not too much space around them.  Cook in the oven at about 200 degrees centigrade (gas mark 6) until they have a crispy outer but are cooked through to the point of a knife.  They usually take about 45 minutes depending on the size of the potatoes and the vagaries of the individual oven.

Oma’s French beans

My Belgian grandmother’s recipe.  A lovely alternative to simply boiling them.

Boil French beans until they are just cooked, meaning they cut crisply in half when you try one on the pan.  Drain and refresh them (run under cold water to stop them cooking and help them keep their colour).  Allow them to dry.  In a heavy bottomed pan on a low heat gently sweat a finely chopped shallot in butter until they go sort of translucent, but don’t let them brown at all, then briefly sauté the beans in the shallot and butter mixture until they’re hot and coated in the oniony butter.  Season with salt and pepper, then serve with the onions scooped over the top.

Wednesday 1 August 2012

First Veg share!

Bennison Farm CSA reached a milestone today!
The bags looked truly delicious, very green, fresh and inviting. The feedback from Veg share members has been so warm and enthusiastic we feel bowled over. The whole CSA has accomplished much in the last few months, so well done all members, the Steering group, growers and all!


I will post the full selection of photos tomorrow but for now I'm going to my fav up and thence off to bed :D

Two lovely Veg share members having a look to see what was in their share.

Monday 30 July 2012

Colour & shape apace!

A few weeks ago I took a walk around the farm with my trusty camera.
We have been so lucky here, many other growers are really up against the weather with crop failures, water logged soils and an uncertain harvest.
We have friends who farm in the West Midlands who have lost a major part of their squash, Sweetcorn, courgettes as well as other vegetables not as happy as previous seasons. It is times like these that Community Supported Agriculture comes into it's own. It litterally supports that grower/farmer and helps them suvive years like these so that they can grow again next year.

Our veg is doing really well, it may be that where as parts of the UK who normally have average to high rainfall have had far too much, here in the dryest part of Essex we have had nearer their normal level. It's like living in Devon but Essex.

We started planting here late in the season due to the heavy rain in April/May and the fact that we only moved here in Febuary, but this hasn't spoiled our crops. If anything they are looking quite perky.

Do you remember these plants?

They now look like this!


There follows some pretty photos of veg...


Here is a pretty courgette and flower. 


Tasty, young spinach...


..growing in a row


Lettuce beds


One of my favourite things ~ Fennel. Tastes good in about anything says I.


Lovely Sweetcorn, great shade of green. A crop that has been hard to grow in other areas this year so we feel very lucky with ours.


Beautiful Broad Beans

Flowery shot. 
We have been lucky with our second lot of broad beans not to run into trouble with black fly. And only one aphid can be seen.
Beetroot, always photographs well. It has such a good shape with strong, vivid colours. 

I would also like to thank my cousins Jane & David Thorn for donating this shed to the project. We've painted it white & I went for a pootle in the local reclamation yard and found this winner of a stained glass window.

The window doesn't open, but the shed is nice and ventilated already so that shouldn't be an issue. The loo is a compost one with a rather fetching lime green seat! We took it down without noting how it went back together so it was abit of a puzzle


It looks like it was only Danny doing the work but I was helping inbetween holding the camera :)


Wednesday 4 July 2012

Membership and Veg boxes.

Bennison Farm CSA is now ready to take members for the scheme!
The yearly cost is £24 per household with a concessionary rate of £12 per household.
This means you are invited to all CSA social events and work days that take place on the farm and you will receive a regular newsletter keeping you up to date with the farms progress.
If you wish to take up a Veg box these will be available from late July early August (exact date to be finalized). In order to take a Veg box you need to be a member of the scheme.

Sadly Blogger won't let me post the info pack and membership form here but if you would like to join the scheme or just more information please email Meg at info@bennisonfarm.co.uk.

23rd June ~ First Workday!

On 23rd of June ( time is moving so fast ) we had our first work day on the farm.
We had been predicted rain for the two days preceding the workday but the ground stayed firm enough to allow cars on and off the site so the day went ahead. We even had sunshine in the morning!


The task was planting Brassicas including January King, Savoy and red and white Cabbage, Curly, Red Russian and Cavolo Nero Kale.

All ages mucked in...,
 ..and a good time seemed to be had by all.

 We had a bring and share tea break where much cake was eaten. Sadly I was too busy stuffing my face with the glorious cake to take any photos of this but it did happen I promise!
The children ( both mine and visiting work day ones) had a great time making dens and paths in the remaining barley. The ages varied hugely and yet all got on extremely well.
If the next one is half to pleasant it will be wonderful.

Thursday 31 May 2012

I really can't believe it's been 11 days since I last updated the blog! So much has changed on the farm over that time.
The weather has actually been really kind to us. That rain we all experienced may have held up the ploughing but once that did eventually happen it meant that the plants and seeds went into lovely damp soil. This coupled with the glorious sunshine we've had has been a dream scenario for plants.

We've had cucumber germinating within days, Squash who can be a bit temperamental practically purring with pleasure at the delightful conditions.

We started off marking the beds out last week the day after the last post.


 Three days a week I have our youngest daughter with me so as we were at the farm she mucked in too.


Plants waiting to go in.


Plants in.


 Little lettuces getting to know their drip line.


 Very late potatoes going in.


360 degrees of farm.